Twist and ARC? How Cycing Makes You Ski Better
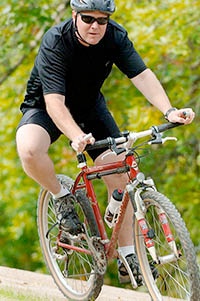
To corner a mountain bike on a soft dry trail is an exhilarating experience. I found that I could add as much as 5 to 7 mph per corner if I employed the proper movement of my ankles, knees and femurs. Here's how to do it.
In the pursuit of expert skiing, we talk a great deal about foot and ankle movements. We often explain how those movements travel up the kinetic chain to link the knee, hips and shoulders.
In this turn, the inside foot, (right foot turning right) starts the movement by tipping the ankle in the direction of the turn, then rotating the knee and externally rotating the right femur. This movement moves the right knee to almost a 45 degree angle to the bike frame. The left leg is long and strong and mimicking the same rotation, but doing so from an extended position.
Mike uses the inside knee to draw the bike into a turn. The (inside) knee is well outside his shoulder and wrist. The turn starts without steering, allowing the bike track through the turn at a higher rate of speed. Photo by John Hanson
The result, the bike dives into the corner with little input from the handle bars allowing the bike to track into the corner similar to a well timed Giant Slalom turn on skis. The key is to start with the inside ankle and knee and mimic those movements with the outside leg. You'll be amazed at how fun corners can be on challenging trails this fall!
Enjoy!
Getting Forward - Even in the Office
One of the most oft-repeated tips or suggestions heard in skiing is to “get forward.” However, a large number of skiers are unable to find that "front seat," or forward position (and yes, I was once a card carrying member of this club). So in preparation for the upcoming ski season, we’ve been working on ways to identify skiing solutions that can be done at home, standing in line at the grocery store, or even in the office.
Head Coach Bob Emery - Staying forward and achieving high edge angles through a carved turn.
Take a peek at the picture above. I’m going to go out on a limb and assume that almost every skier would love to lay claim to this position during their turns. (That’s AME’s head coach, Mr. Bob Emery, in case you’re wondering). Before I started working with Bob, I spent years trying to find this position on my own. And more times than I would like to admit to, I found myself retrieving my hat, goggles, poles and skis instead of enjoying the thrill of high speed carved turns.
One of the keys to making turns like the one in the picture, is a “forward position.” So even though the first ski resorts won’t open for another few weeks, there are ways you can begin preparing your muscles to “get forward” right now.
The first objective is to “feel” the forward and back positions. So, right now, stand up, spread your feet shoulder-width apart, hold your hands out in front of you (with your imaginary poles in place – and yes, your co-workers will laugh if they catch you doing this) and close your eyes. Ok, I guess you can keep your eyes open long enough to finish reading the drill. But it is important to actually do this with your eyes closed. This forces your body to find balance without any external clues.
So with the peepers tightly shut, gently rock back until your weight is on your heels. Feel that? Welcome to the “back seat!” Now make a mental note for your body to remind you to “stop that” whenever you feel this sensation on the hill.
Now let’s start over. Only this time, we are going to gently rock forward until the weight is on the balls of our feet. Ahhhh, say hello to “front seat driving.” The goal, once we are clamped into our boots and bindings, is to be in this position as often as possible. One thought that has helped me is to think about being able to slip a credit card under my heels whenever I’m skiing.
Now let’s try something else. Let’s return to the back seat by rocking back on our heels. Now slowly rotate your hips to the left. Where does your weight go? During our not-so scientific study, we found the answer to be that the weight wound up on the right heel. And if we start a turn in this position, thanks to the forces that occur in a turn, it is gonna take a Herculean effort to get in the proper position (credit card sliding around under the heel) before the turn ends.
Before the boss spots you, let’s try it one more time. With eyes closed and your imaginary poles in position, rock forward to the balls of your feet. Now gently rotate your hips to the left and see where your weight is. Yep, you got it right; our weight is on the balls of the right foot! Now think about extending that leg early in your turn and you’ll be skiing like Bob in no time! (Well, actually, a couple/three camps with Bob will definitely help!)
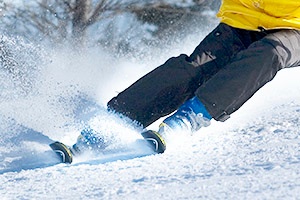
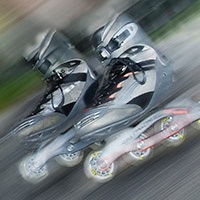
Feeling the Wheel
As the first ski magazines hit the shelf, my mind has turned from golf to skiing. . . well rollerblading anyway. I've been carving up some of the finest hills around and through my experiments with edge angles and wheel pressure I made an interesting discovery. I can feel each wheel through the turn! Just as you want to feel the entire length of your foot throughout a ski turn, you can actually do this on rollerblades. Here's how:
Pick a gentle slope, and start a large arc downhill. To start, gently pressure the front wheel of the skate. This pressure should be mild in the beginning and as you gain confidence and experience, you can apply varied amounts of pressure to the front wheels. Now let's put this into a turn.
As you start downhill, pressure the very first wheel on your inside blade (right foot turning right, left foot turning left) and tip that foot in the direction of the turn. Now mimic that action with the outside foot, by pressuring the very first wheel at the beginning of the turn and tipping in the direction of the turn. As the turn progresses, move that pressure to the middle two wheels on each skate.
In the apex of the turn, (going straight downhill) your weight should be over your outside foot. Now release that turn and start tipping both feet simultaneously in the other direction.
Yes you guessed it, start pressuring the other set of wheels. Adding pressure to the front wheels at turn initiation is similar to an early edge engagement on skis. To ensure snappy turn transitions, be sure you tip your new inside skate first.
Remember to wear safety gear as speed control on rollerblades is not as precise as it can be on skis. Have fun and enjoy the summer. . . while it lasts! Keep checking the website as new training techniques will be posted regularly throughout the fall. Questions? send us a note through our contact AME Ski Camps button.
Getting forward and finding balance: A battle with your inner pendulum
How many times have you read, heard, or been told to “get forward” by an instructor, friend or coach while skiing or rollerblading. So you move what seems like a HUGE amount forward only to be told the same thing on the very next run. So, you think to yourself, “What’s the deal with getting forward? Is it some sort of cosmic flaw with my balance, am I the ONLY one who has this problem?”
The answer is no. You are not the only one who experiences lapses in body position and balance. There are ways to practice better balance and body position.
In the office: stand on one foot, bend your knee slightly and count to 10. See if you can stand quietly on one foot without a great deal of counter balancing activities. See how little you need to move your upper body to affect your balance
On rollerblades: Skate on one foot for a 5 count and see how straight a line you can follow. Keep your feet under your hips and travel as straight as possible. You will find the slightest change in upper body position can have a huge affect on your balance while in motion.
On skis:
1.lift your toes to scratch the top of your boots, this movement should lever your shins and upper body forward into the boot cuff, now keep that pressure consistent the rest of the run. See The Boot Cuff Clock tip for more advice on staying forward throughout a turn.
2.Ski on one foot across the hill, see how clean a line can be left in the snow. Play with lateral movements to enhance your balance on edge.
These activities will all help you feel what small movements with the upper body affect body position and balance on your skis and rollerblades.
back to top
Hand position - A refreshing experience
Positive hand position when rollerblading or skiing can be what saves a slightly out-of-balance experience from road rash and intimate moments with trees. If I’ve been told once I’ve been told 1,000 times, “get your hands up.” Sound familiar, so on a recent quest to solve this hand position mystery I made a discovery that was truly life changing.
Good hand position is a RESULT of good body position on skis and rollerblades. Okay great you knew that already, how to maintain good hand position while in motion is really the true quest. There’s a trick. . . . and here it is: as you move from one turn to the next, immediately following the pole touch, raise that pole tip out of the snow or off the asphalt a few inches higher than normal. Continue raising the pole through the belly of the turn. This keeps the inside half of your body from twisting uphill with the force of the turn and creates an anticipated body position for the next turn. This simple lifting activity actually keeps your uphill shoulder moving downhill.
This may sound odd, raising the inside hand, but try to make it fun, see how much you can air out that armpit during the exercise, after some long runs this can be a refreshing experience indeed.
The boot cuff clock – Ski through the numbers
Picture the opening of your ski boot, now superimpose an image of a clock making sure 12:00 o’clock is centered in the middle of the boot tongue. As you blade straight away, make sure you have even shin pressure at 12 o’clock. To make smooth turns ensure the pressure remains constant on the clock.
To initiate a turn to the left, move both shins left making sure the left shin is moving from 12 to 11 to 10 and then to 9 o’clock as the right boot follows along. To make a turn back to the right move your shins and ankles from 9 to 10 to 11 through 12 over to 1 to 2 then to 3 o’clock. The turns described should take your path perpendicular to the fall line, thus scrubbing speed when necessary.
The key to using the boot cuff clock is to:
1.Never look down at the clock – keep your head up looking toward the next turn.
2.Maintain consistent pressure on the boot cuff and boot tongue
3.Never skip a number on the clock. For example don’t rush from 9 to 12 to 3. This will wind up being an inefficient turn with more skid than carve.
4.Stay away from the late afternoon hours from 4 to 8 o’clock
Remember to touch the numbers in your boot cuff clock on every turn and your rollerblading and skiing will be smooth and efficient.
Have fun!
•- Coach Mike
•
•
The coaches of AME Ski Camps have spent years identifying these and other fundamentals of expert skiers and have developed a training program to make expert skiing a reality for more skiers.